Sunday, 24 July 2011

Chapter 3,1: Kostov meets Trabant


Sorry for keeping you waiting, Even though I have not been writing on my blog lately I have done a lot of work on the electric car, both electric vehicle conversion work but also lots of car restoration work on bringing the car back to a road worthy condition at a minimal budget, later I will make a post about the restoration and my attempt at doing a professional repaint of the car back to its original colour.


But first things first:
Finally after spending the winter locked away in a garage somewhere in Odense I took my Trabant home to meet its new engine.


As I am a poor young man and home was only a few blocks away from the workshop, I pushed the car home, with the help of my dear strong mother, in order to save the expense of a tow truck. My warmest thanks go out to her for her involvement and help in my project.


When the car was safely home in my garage a new challenge emerged. How to get the electric motor hoisted safely down in place. The old Trabant engine was so light, that I could remove it by hand power, but the new motor was slightly heavier, this plus that I need to hold it suspended in order for me to measure for, and later install the motor mounts, which are going to keep the motor locked in place.


The solution:


Usually what most people recommend would be to use a standard engine hoist. But the cheapest of those cost 1200.- DKR and afterwards they take up a lot of space in the workshop, space which I simply does not have. So here is the solution: a home made crane, made out of scrap wood and a ladder with a 450.- DKR electric hoist bought at Bauhaus.


Was this "crane" safe one could ask?
Before I hoisted the motor with it I, weighing much more than the motor, climbed up on the plank holding all the weight and bounced it a bit. The contraption passed the test and I could move on and put it to use.

Redneck Ingenuity I think the Americans call it, This is the kind of thinking we need here in the financial crisis.


The adaptor plate was not a perfect fit, the shaft of the transmission and the shaft of the motor was not precisely aligned so I could hear a lot of friction noise. I guess measuring it from a piece of a cardboard is not precise enough; a couple of guys on YouTube used a piece of plexiglass which is probably a much better method.

However this is nothing that can’t be corrected. I just took out the transmission and placed it on top of my motor down in my workshop. I turned on the motor at 12 Volts and let it spin with the transmission on top, and then I moved the transmission around until all the friction noises was totally silenced. I put some clamps on to hold it in place and drilled some new holes in the adapter plate, put bolts in the holes and voila!

I did not have to fear that the bolts could just slip back into the old holes since I was kind of aware about the possible tolerance from measuring with cardboard back when I did the measuring so I asked the factory making the adaptor plate to make those holes smaller than the holes I would be ending up with for the bolts.


I would also point out that locating the correct alignment by sound was made allot easier because I had a brand new Kostov motor that did not produce much noise to distract me. if I had an old worn motor this method could have been more difficult to me.

After bumbling about with the motor and transmission a lot of the paint on the transmission got damaged so I chose to re paint it, but that is okay they do that all the time in American-Hotrod.

At the end it got back in the Trabant again, I tested it once again on the 12 volts jump-starter power supply and was able to move the Trabant in and out of the garage plus change gears and use the Clutch without any obstacle, even on a little 12 Volts 17 AH battery the car moved around smoothly.
A bottom frame holds the original two stroke engine in place with one big rubber mount. in the middle. As seen in the video about my electric motor I have a mount that goes around it with two holes at each side. So to acomodate this I bought two small rubber shock absorbers and fitted those to the motor mount of the electric motor.


Then liftet it up from touching the bottom frame using my crane and then fittet some pieces of metal to conect between them and the bottom frame that used to hold the original motor. I put it together with some dot welds then removed the rubber shock absorbers to protect them from the heat and started to solify my weldings.

Afterwards I masked the new mounts off and painted it in corotion resistant black paint, here is how it all looked at the end:


I am left with lot of confidence that this will turn out as a great electric vehicle once I get some traction batteries.


All this was videofilmed aswell, I wil upload that on another post.

Wednesday, 13 April 2011

Chapter 5: Controller Assembly

It was still in the middle of the cold winter when the assembly kit for the controller arrived.
The leave of absence, which I have taken from my education, had just started for me, so tugging away from the cold in my warm little workshop with an exiting project was a great way to start my year off.

I wished to document the assembly of the controller on video in both Danish and English. Unfortunately my mothers computer, on which the videos were stored, caught a virus and the people responsible for fixing the computer and preserving the data forgot to backup the entire D-drive where the videos was.

The result was that the only part of these recordings which was somehow preserved was this play-blast which I made while editing the video:


Through there was some accidents and dismay during the assembly of the controller, such as high import tax when I picked up the package, that awful virus and some confusion when I tested the control board on a too low power supply. It all came out functioning as it was supposed to. so in the end it had a happy ending:-)

As you can see it controlls the motor:


Go to 5:17 if you want to skip the talk and see it in action.

Cargo Trike Needs a new Home

Need a Cheap electric ride that turns heads?

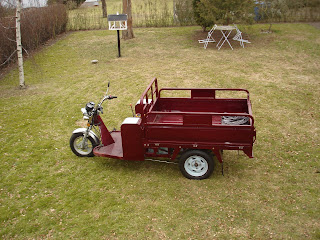
Head of a motorcycle body of a truck, you thought these creatures only existed in myths?

Because I need space and money I have decided it is time to pass on my Shining 500ES Electric cargo trike on. It is a factory build electric version of the Chinese cargo trike made by Shining Motors in 2007 and imported to Denmark. The only of its kind in Europe. and also the last in Europe since production of the 500ES ceased in 2009.

Here is the story:


It can be all yours for just 10000,- Danish Kroner
= about 1.340 EUR or 1.915 USD

Are you a trucker or a biker or are you just a little of both?

Perfect for your secret base, farm, factory, mill, home, museum, shop or mansion.
Just picture your evil minions hauling stuff around the secret lair on this.
Or you can haul the kids down to the swimming hole if you are more normal.


It comes complete with:
a brand new 12 Amp smart charger from 2011 that can be upgraded for Lithium batteries.
a battery-pack of 5 * 12 Volt 120 AH deep cycle lead acid batteries.
Below 100 Km on the odometer

Features:
½ Ton load capacity
100 Km range pro charge
45 Km/h maximum speed
Breaks on all wheels.

More Info:
http://www.evalbum.com/3364


Saturday, 22 January 2011

Chapter 5, Buying the controller

I have just ordered a kit for building the cougar controller!

First of all I would like to explain how a controller works to all those watching, who are not in familiar with the components in an electric car:

In an electric car the controller is the component which adjusts the speed of the car as mentioned in chapter 4 (about the potbox) In a DC electric car, such as my own it does so by adjusting the voltage.


Back in the old days, adjusting the voltage to control an electric motor was done with big resistors, the resistors were then bypassed by a switch one after one when you wanted to increase the power and speed of the motor.
However this was highly inefficient as the resistors would just burn of all the power that would otherwise been used in the motor! Kind of like controlling a combustion motor by opening a hole in the fuel connection and just burning off the excess fuel when you want the motor to slow down.


Because this was highly inefficient the old trams back then also tried, as much as possible, to avoid using this to control their speed.
If you notice it there are a lot of wires sticking out of their traction motors, this was because they could also choose only to turn on parts of their motor at a time so that they could control the speed in a such way.

Luckily new technologies came along, so I do nether need big power consuming resistors nor a complicated motor.

This is how it is done today: Full voltage is fed into a modern controller it turns the voltage by switching the power on and off in a series of rapid pulses typically above 15000 times in a second depending on how much it is left on the ON position or the OFF position the voltage "changes" and thereby the speed and power of the motor can be controlled.
The Cougar Controller:


The Cougar controller unlike others on the market is an open source controller, which means that the plans are free on the net so you can build it your self out of parts you find, or you can (as I did) buy a complete kit from Paul ( http://www.paulandsabrinasevstuff.com/evmotorcontrollers.html ) The person who developed the open source controller.
Open source projects also allows people to improve on the design along the way

Usually I recommended to go for factory stuff when building an electric car. This is because of safety reasons. It is easier to test and certify components build in a large quantity than the fledglings of armatures.

However in this case this particular controller has various safety features that is comparable to the ones at a commercial controller. http://ecomodder.com/wiki/index.php/ReVolt#Frequently_Asked_Questions
see under "EV DC Motor Controller "Cougar" Features"

Videos from the project on Youtube!

I finally got a nice camera so I can document the project in living pictures.
I almost can't wait to film the next stage of the conversion.